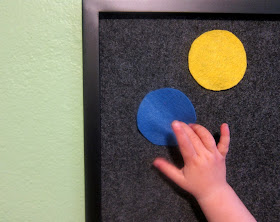
Switching out Alice's crib for a toddler bed left us a big blank wall that I've been thinking about how to fill for the past couple of weeks. I wanted something she'd enjoy - that was also pretty to look at - and came up with this take on a felt board.
Maybe in the future we'll add some fancier shapes and turn it into more of a story board. But for now I kept it simple. Already an expert in color identification, Alice has begun to dabble in counting and sorting, and I think she'll have fun moving the bright circles around.
This was super easy - it got finished in the space of a longish nap time. And it's a good way to use up those scraps of felt left over from other projects (Thank goodness you didn't just throw them away!).
You'll need: A poster frame - mine was 18"-by-24" (Go for one with a window made of acrylic or some other type of thin plastic sheeting. It's cheaper than glass, and since the finished project is going to be handled quite a bit, probably safer.); dark-colored craft felt - about 1/2 yard off a bolt (more or less, depending on the size of your frame); individual sheets of craft felt in a variety of colors; strong tape; a fabric marker; scissors and circle templates (I just traced around a small bowl and a couple of jelly jars).
Step 1: Take apart the frame. Set the clear plastic sheet on top of your large piece of felt. (If you're working with an old frame that no longer has any glazing, or if you want to replace a glass window with something less breakable, you could try a piece of cardboard that's been cut down to the correct size). Using scissors, cut the felt so that it's about 2-3 inches larger than the plastic sheet on all sides. Just eyeball it - this doesn't have to be exact.
Step 2: Make two snips, from the edge of the felt to just shy of the edge of the plastic, on all four corners - you're cutting away the corners so that the bulky felt will be easier to wrap around the sheeting.
Step 3: Starting with one of the long sides, fold the felt down over the plastic and secure it with some strong tape (I used polka-dot duct tape, mostly to prove that it wasn't just an impulse buy. You could use something else.). On the opposite side, pull the felt tight around plastic, and tape it down too. Repeat on the short sides.
Step 4: Reassemble your frame with the felt-covered window in the middle. Your felt board is finished. Hooray! Now comes the fun part.
Step 5: Trace circles in various sizes onto your rainbow felt pieces (I used an air-soluble fabric marker, but any kind of marker would probably work) and cut them out. If your kids are of scissoring age, they might like to help.
(It's easy to get carried away here.)
Step 6: Gently press your circles onto the board. They won't hold up to a wind storm or anything, but they stick pretty well. You can hang your board on a wall or let it be portable. I really love how interactive the finished project is - and it's more fun than you'd think to play with different color combinations. Remember to take turns.


